Culture
Heave DIY: Curing Lump Ass
Each week in Heave DIY, Seetha Sankaranarayan journeys into the depths of her junk drawer and her jaded heart to share crafty tutorials and tips on leading a purposeful post-grad life.
This DIY goes out to my friend Dan, who helped me to diagnose and rectify unfortunate cases of ill-fitting pants.
It all started last year when we were section editors of our university’s student newspaper. While arranging the story I had written about Kelley Deal’s recent lecture on campus, I asked a few people in the office for advice with selecting a photo. One portrait had distracting text projected on the wall in the background, while another was shot from an angle that made her rear end look…really sad.
“Guys, I can’t use this photo,” I said. “Kelley Deal is an incredibly talented musician and her talk was fantastic. But in this picture she has a lump ass.”
I know, way superficial. But we’re all bound to come down with the lumps at some point or another. Stump legs and troll butt just ain’t cute. So grab your most slovenly pair of pants and get ready to give your butt the slammin’, sleek fit it deserves.
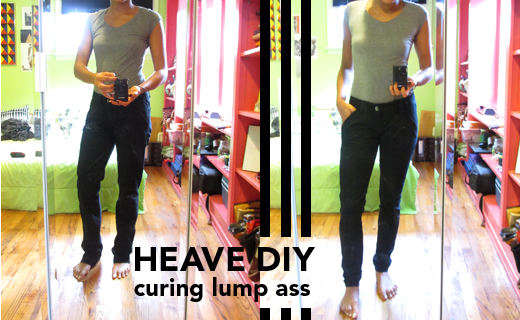
Slouchy to skinny
I bought these pseudo motorcycle jeans in high school simply because they were black and on sale. In time I realized that they did absolutely nothing for my shape, and so I relegated them to the back of my closet until I gained a few pounds and inches to fill them out better. While 2012 trendsters rock the slouchy, relaxed fit with confidence, I know I’d get more mileage out of these suckers if they were tailored. That, and Dan thinks they’re silly.

Materials:
-loose fitting pants
-thread in a matching color
-straight pins
-sewing machine
Time: 1 hour
1) Put on the pants and determine how you’d like to change the fit. I wanted to shorten the length, shave away the inseam to make the leg skinny, and bring up the crotch to eliminate a weird bulge. Iron the pants to smooth out wrinkles and create a guide for the new hem, if necessary.

2) Put on the pants inside out. Pinch the areas you want to take in and pin them. You can also use tailors chalk to guide the stitches.

3) Thread the sewing machine and begin sewing from the crotch down one leg, then the other. Sew the newly shortened hems as well.

4) Flip the pants right side out and see how you like the new fit. If you’ve made any areas too tight or too loose, remove the stitches with a seam ripper and adjust accordingly. When you have reached the desired style, carefully cut away the excess fabric.

Turn the pants right side out and try them on. See ya later, lump ass!
Want more cold weather clothing conversion ideas? Check out this tutorial to learn how to turn a regular scarf into an infinity scarf.
Pingback: Sweet and Sharp, Volume 1 « In Our Words()
Pingback: Heave DIY()