Culture
Heave DIY: Graphic drinking
Welcome to HEAVEmedia’s swap week! Our columnists have taken over each other’s articles for these next three days. Today – Amy Dittmeier takes over Seetha Sankaranarayan‘s Heave DIY and shows you how to make your own coasters.
It’s pretty apparent from my work at Heave that I love comic books. The problem though is that once I read them, I store them away, place them safely in my long box with a bag and a board. It’s a common plight amongst us nerds – our interests and hobbies are all stored away in boxes and bookshelves, or hidden on video screens. What’s a cool, hip way to make our obsessions more visible?
You can only own so many comic book/video game/movie shirts before you become “that guy,” who wears a different witty t-shirt every day at work that people secretly snicker at at lunch. There are easier (and less obvious) ways to get your passions out there. Luckily booze is always a good equalizer. Up your drinking class and show your nerd pride with these comic book coasters. To start off you’ll need:
– some old comic books (or magazines if you’re not into comics)
– 3-5 plain ceramic tiles (easily found at your local hardware store)
– glossy or outdoor mod podge
– clear acrylic varnish gloss
– presto-felt
– foam brushes
– scissors and a ruler

Time: 1 hour
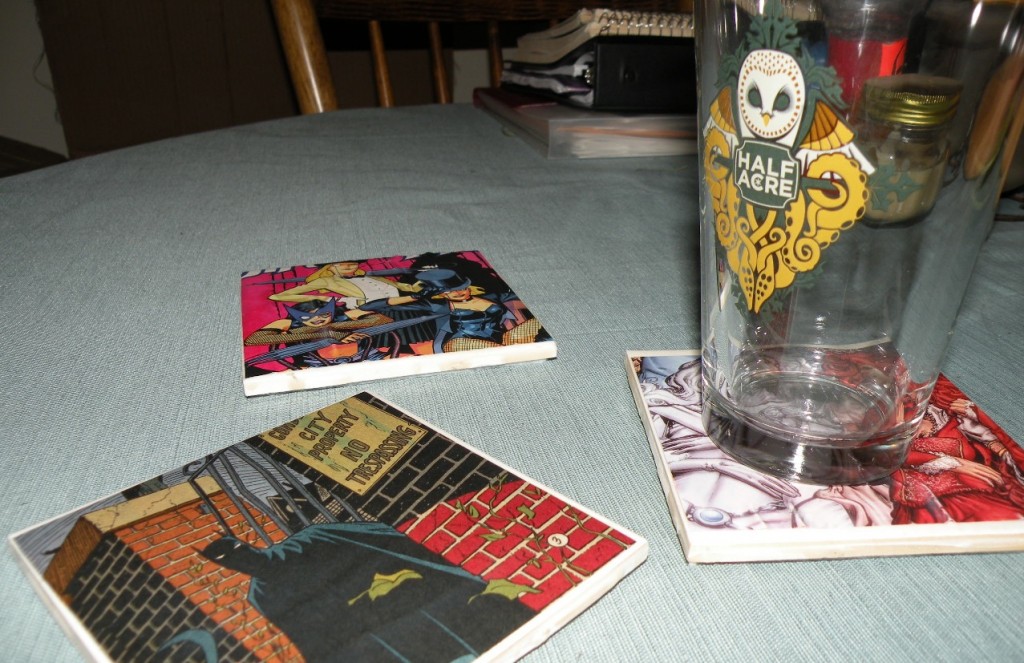
1) Find some good images for your coasters from your stack of comics/magazines. Cut to around the size of your tiles (mine were about 4.25″x4.25″ so I cut my images to about 4″). You can even cut out multiple images if you’re feeling a little more adventurous.

2) Using the foam brush, put a thin layer of mod podge onto your tile. While the mod podge is still wet, carefully place your image onto the tile. Make sure to really smooth the paper out so you avoid those pesky bubbles and creases. Let it dry for about 20 minutes.

3) Once the mod podge is dry, apply a coat of varnish to the top of your image. If you don’t want to buy two separate things for this step, you can use glossy mod podge for your base coat and your top coat. Brush the finishing layer in the same direction to create an even tone. Wait another 20 minutes to dry. If you’re using the varnish, repeat if you want it to be shinier.

4) When your top coat is dry, cut out a 4″x4″ square of presto felt (basically felt with an adhesive back) and attach it to the bottom of your tile, pressing down hard to make sure it sticks. This will make sure your new fancy coasters won’t scratch up your table.

5) Put your favorite beverage on top of your new coasters. Sit and admire your work while playing a round of Marvel v. Capcom 2 (which is exactly what I did when I was done).